| Page
3 - New parts and some new plans |
|
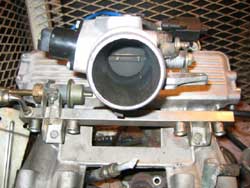
After
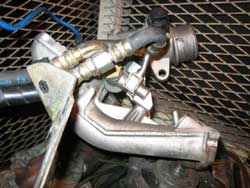
long time finaly some new things arrived - here is intake
mani from Punto Sporting 1.6ie - it's much better designed
then my old 1.3 Uno Tie mani, and what is most important
to me - it has rail that holds injectors so I don't
have to make custom injector holders - hoooorrrray!!!!
Throttle
body butterfly is about same size- cca.45mm, I think
that would be enough airflow for me and my small 1116cc
engine :-) |
|
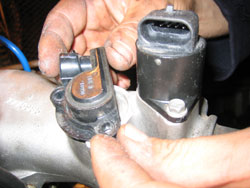
This
are some other very good news for me - that intake has
potentiometer-type TPS already - it's small gizmo between
two hands on pic, and it's GM product, unlike Weber
or Bosch,which were std on 90% of older Fiat models..
And
things are getting even better - intake mani even has
small IAC (idle air control valve) integrated near butterfly
(on right) - if I ever would need one to stabilize idle
engine speed, I don't have to improvise with IAC - great
news! |
|
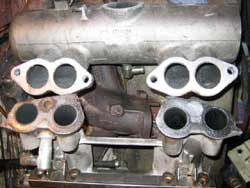
Comparison
between old Uno 1.3 Tie manifold (up) and new, Punto
sporting 1.6ie manifold (down). Flanges are little different
, but bolt pattern is the same and both manifolds fit
on 1116cc block without problems.
That
old Fiat SOHC blocks have about million interchangeable
parts, everything fits everywhere, isn't that great?
|
|
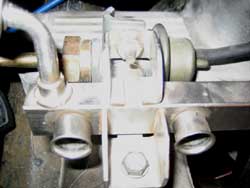
This
is close-up on very small standard FPR - it is so small
that I am little suspicious... is that little guy gone
survive any boost , ha, ha :-)))
Square
metal thing with two holes is fuel rail - it is designed
so that rail when mounted, holds firmly injectors in
their places so that no other method of sealing injectors
isn't necessary - that system is standard on 99% of
today modern cars, unlike old systems like on my 1.3
Uno manifold that has stupid injector holders for old
barb-style Bosch injectors (I think that barb-style
injectors were on older LE-jetronic EFI cars). |
|
Side
view of the manifold, I've been realy lucky so I've
got complete setup: manifold, TPS sensor, IAC valve,
fuel pressure regulator with rail, one solenoid, and
complete fuel fittings and brackets. |

|
TPS
was removed to check resistance between pins and to
make new harness for Megasuirt instalation - my modified
IAW harness that I will use with MS has older TPS connectors,
this TPS has new, smaller connector with rubber seal
to keep moisture out . |
|
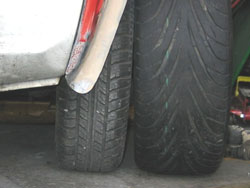
And
now something completely different - before couple of
months, I bought some old second-hand Toyo Proxes T1-S
tires, dimensions are 195/45/14", so I have to
find proper wheels, grooves are slightly worn out, but
afterall, that tires would be temporarily mounted and
will be used hardly only for burnouts - they will never
see hard cornering , I promise :-()
On
the left you can see comparison between old Michellin
155/65/13" tire and new Toyo - they should look
nice.
P.S.
I
know that thread direction on pic is wrong - it's only
for comparison...;-) |
|
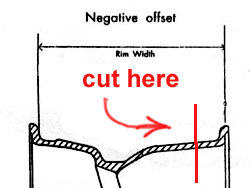
As
tire is relatively wide, I will need at least 6J wheels...
but my thinking is why not going little wider then that?
On
the left pic my cruel plan can be easily visible - I
need 2 identical steel wheels to make 1 wider wheel.
How you may ask ?
Process
goes shortly like this:one wheel will be cut just like
one on the picture and from the other I'll cut 2"
wide strip and then that strip will be placed between
left & right pieces of first wheel - that way I
get 8J steel wheel with same distance between suspension
parts and center of the wheel as normal 6J wheel. Of
course, they must be balanced and checked for possible
errors prior to TIG welding.
That complicated job will be done when I finally finish
with my bodywork....
|

|
That
is nice example how widened steel wheel would be looking
if everything went OK with the process - they look great
and what is imortant to me - much less aggressive then
standard alloy wheels - flat black paint gives them
invisible, OEM look that I like. |
|
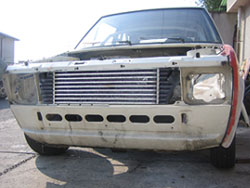
This
is my favourite part - how to mount very large Saab
intercooler in tiny Yugo chassis?
Not
easy, but it can be done, on the left is picture that
I made in Adobe Photoshop to see how it should look
when everything would be finished - I already cut and
rewelded plastic IC tank ends - they are shorter about
10cm on each side.
That
and few other minor modifications and that IC will be
perfectly mounted inside (though there wouldn't be much
space left :-)))
|
|
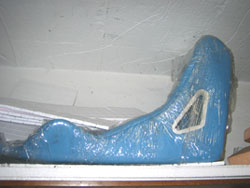
My
Sparco sprint bucket seat - don't ask me why it's blue... |

|
And
now - little combustion theory - as reliability of turbo
engine heavily depends on avoiding detonation, one of
the most important things to avoid that scenario is
beside lowering compression ratio, shape of combustion
chamber. Combustion chamber is science for itself and
still there are some mysteries left for scientist to
solve...but some things can be done by DIY-ers.
On
the left is drawing of piston in TDC, with famous "squish
zone".
Squish
zone is shortly, thin air gap between top of the piston
and flat portion of head deck. A/f mixture in squish
zone is pushed toward spark plug when piston approaches
TDC and result is better A/f mixing, better combustion
and engine less prone to detonation, squish is very
important thing to combat detonation.
I
am planning some serious combustion chamber mods in
future that include squish zone - but I would left that
as secret for now...;-) |
|
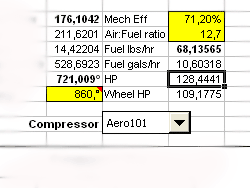
I
played a little with some Excel worksheets for turbo
engine calculations- for my 1116cc engine that has 7.6
CR on 1.5 bar (21psi) boost and normal atmospheric conditions,
I get results on left pic - 128 HP on flywheel and around
100HP at wheels wouldn't be bad at all...we'll see...
|
